 |
Friday, September 13, 2013
Good buy summer cabinet


Thursday, March 14, 2013
Casual spring table


Thursday, December 6, 2012

Friday, November 30, 2012
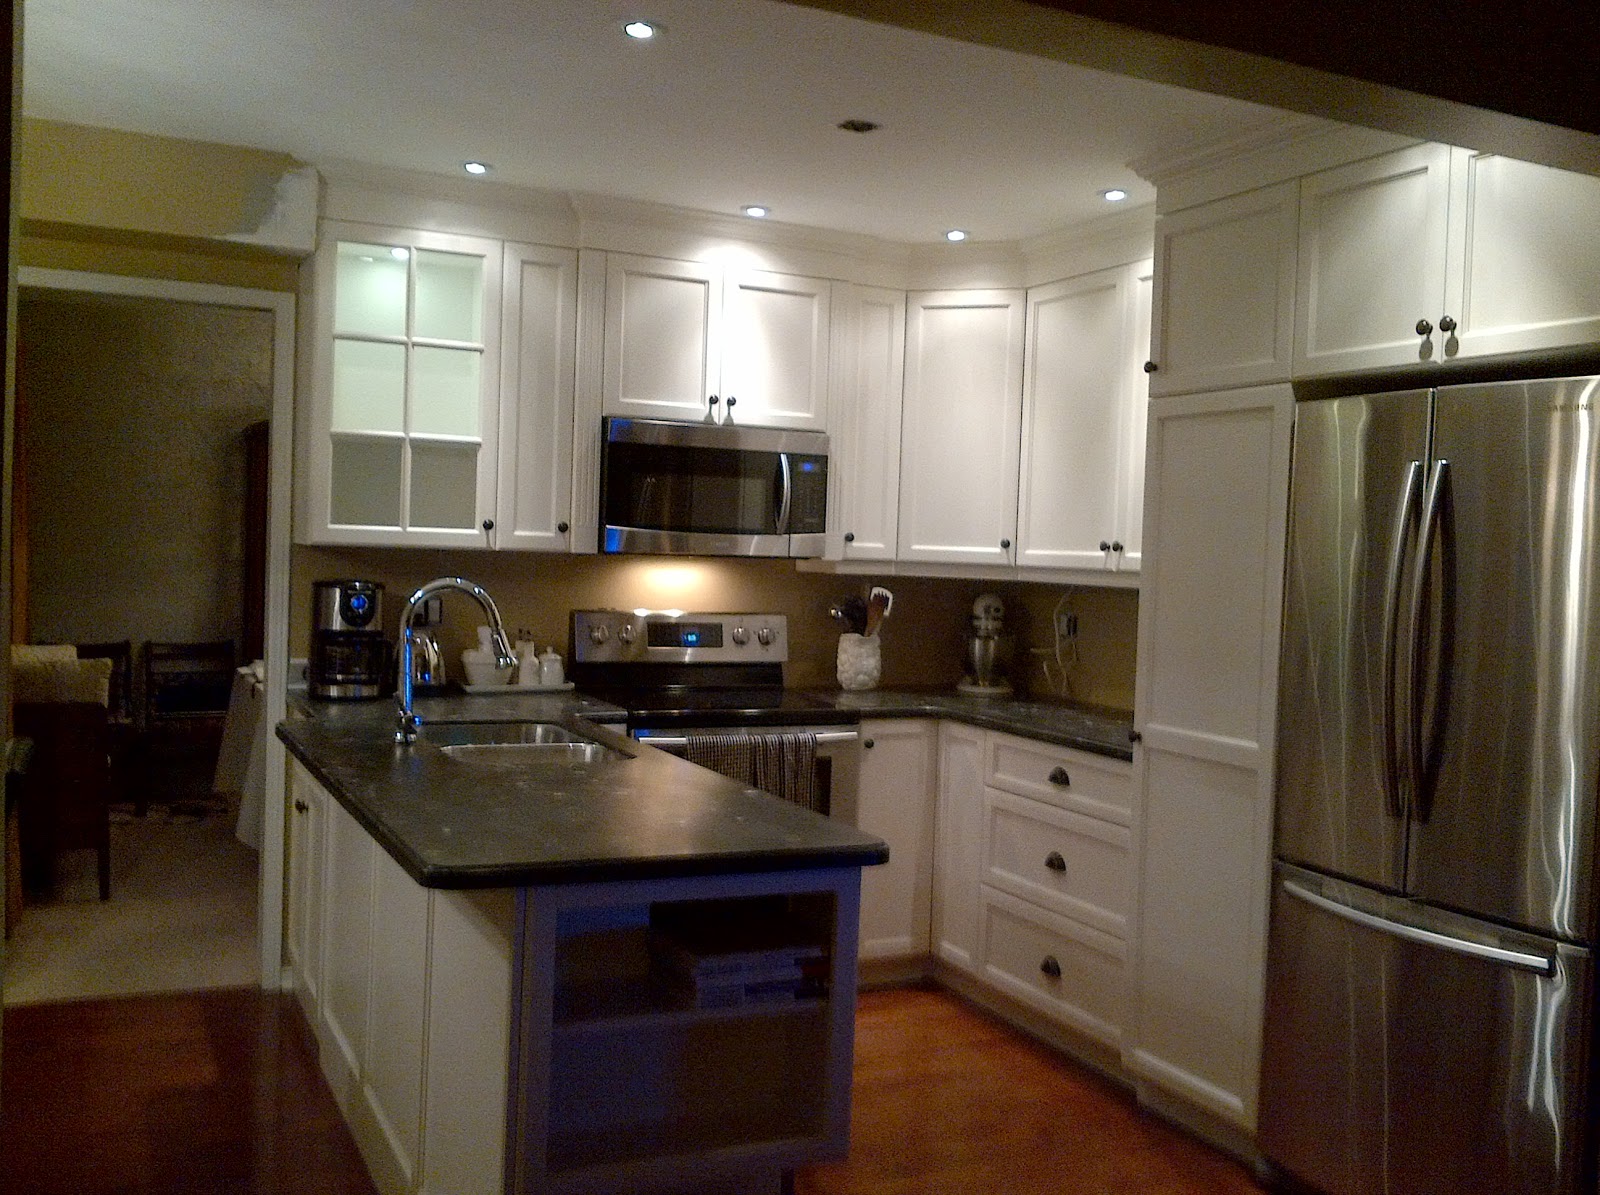
cta da! the finished kitchen. Well not exactly. we still have a few small details to finish. We got the microwave installed tonight with some help from my daughters boyfriend. Love the result. Love the counter top (corian )
 Dog feeding station. We don't have to feed Cole in the laundry room anymore
 I couldn't be happier with the finished product
 Friday, November 23, 2012

Thursday, November 22, 2012


Saturday, November 17, 2012
November 17th Progress
 Here's how our day started. The dishwasher was delivered. Why is it that if you are waiting for something to be delivered because you really need it right now and the delivery guys tell you it will be between 8 and noon it shows up at 12:05, but if you don't really need it today and you are trying to have a little sleep in on a Saturday morning it arrives right at 8:00 am. That's right, I answered the door in my pajamas.
  This afternoon Rick finished putting in the pot lights and the dimmer switches. What a huge difference it makes- finally some real progress. Tomorrow we finish mudding and maybe begin painting. Yea
Friday, November 16, 2012


Friday, November 9, 2012
The Doorway has been closed off. Now to see what's behind that bulkhead

 |
| view from the front hall |

Meanwhile, I have been working on the guestroom in anticipation of company coming over the holiday season. If you follow my pinterest board its the room that is currently painted two shades of pink. The yellow (bm Hawthorne yellow) is the colour choice and the bed and bedding from our old house is in the last picture. I am currently deciding what to do about the drapes as the ones from our old house will not be long enough for this room. Hopefully I will be able to post a progress report over the weekend
Wednesday, October 31, 2012
Kitchen reno

 |
| When we moved in, I added some temporary decoration for about 12 dollars. I took off the doors on the cabinet over the peninsula and backed the cabinet with a vinyl table cloth from the dollar store. I also picked up some matching tea towels. I brought out some Robbin's egg blue plates that I had and added some bags over the fridge - just because they were the right colour |
 |
| This is what my kitchen looks like today - great eh? The upper cabinets are gone, gone, gone; and the bulkhead is on its way. |


This is my temporary kitchen set up in the diningroom. I have stuff here, in the origional kitchen and downstaris in the new pantry. Making dinner is a treat,

Tuesday, February 7, 2012
 cutest little helper ever
I just got a blackberry playbook for Christmas and wanted to try it out. The Picture was taken on the playbook and posted directly without any editing. I think it turned out pretty good. I do find however that it is a pain to type on. I guess I am old school ( I use all my fingers - not just my thumbs), so I may have to get a keyboard thingy if I am going to use it very much for blogging- That is if I do any more blogging. I haven't been very good about that. I would like to blog more, really I would, but it just feels like I am talking to myself sometimes. Is anyone out there?? Since I don;t have any followers yet, I guess I really am just talking to myself. Oh well at least I don't mind if I make the odd spelling mistake.
Monday, March 7, 2011
Fat Tuesday

Saturday, March 5, 2011
Drop Cloth Slip Cover

 |
| not my chair |
This is what it looked like around my house last weekend, so I decided to tackle a chair that I have had for some time. This chair actually belonged to my grandmother and I have seen many of them over the years and they look quite nice when reupholstered.
 |
| this is my chair |
I made some inquiry's into the cost of having that done and it would be about 300.00 in labour + fabric. Not really to bad - depending on what fabric you choose, but this chair was still in really good shape and I kinda like the dark green colour although it doesn't fit with my current decor. So inspired by all of the blog posts about using drop cloths to make slipcovers, and buoyed up by the instructions by Miss Mustard Seed, I purchased by drop cloth and began. I got the drop cloth from Home Depot for about 15.00, and following Miss Mustard Seed s directions I washed it with a cup of bleach. I was afraid the fabric would be too stiff and hard to work with, but found the exact opposite was true. Once it was washed a bleached the fabric was soft and wonderful to use.

The first step, was to make the welting for around the arms. I used my rotary cutter to slice of a strip 21/2 inches wide and using a zipper foot, I encased the welting in the fabric. Sorry I thought I had a picture of that. Next I measured the approx width and length of the front of the arm and sewed the finished welting to this strip making a nice curve at the top. Now the arms are finished, I moved on to the seat. For the seat, I cut a big ole hunk of fabric about 4 inches wider and longer than the seat base. I didn't take any pictures of that, but that's really all there is to it.


For the inside front, simply cut a piece the approximate width and length needed - leave lots extra you can trim it later.
 Next for the outside back - this is the toughest piece so far so take your time - It took me three tries to get it right before I could cut my backing piece. Drape the fabric all the way around the back starting in the centre. Pin the fabric in place. Here's a trick I learned from my hairdresser - you can't see it very well in the picture, but to hold the fabric in place use two straight pins placed at opposite angles. The fabric will stay wear you want it. I discovered that if I was careful, I could use one piece of fabric around the entire back from the front of one arm to the front of the other arm and if I cut carefully at the front edge of the chair back, I would leave a nice chunk to fold down and form around the inside arm of the chair
Once the back and front were in place simply sewed on the pinned lines - removing the pins as you go of course. Then I sewed the arm front pieces in place. This is wear you want a nice tight fit, but not so tight that you can't get the slip cover on and off. I put it on and took it off after every step to make sure. Next I sewed the seat to the inside back, leaving about 4 inches of fabric to tuck in. The trickest part was sewing the sides to the seat deck. I was pondering this part so much I forgot to take a picture, but basically I pinned until I got it how I liked it and sewed my seam. For extra credit at this point I went over the seams again with my serger to make the cover hold up better in the wash. I finished off by adding a chunk of pre-maid fringe to the bottom. ( I Love Miss Mustard Seeds pleats but I had had enough by this point.)

For the final fitting I used a paint stir stick to push the excess fabric into the crease. You have to do this periodically with slipcovers or they will pull out and start to look like crap.

Here we are, the finished slip cover. I used about half the drop cloth for this and it took about one afternoon to complete ( about the same time as it took me to write this post) I also made the pillow from a tote bag that I picked up for about $7 dollars last summer. Not a bad investment id say. I am a pretty good sewer, but anyone should be able to do this - just take your time and go slow. I it doesn't work you haven't invested to much or messed up the chair, but if it works - Wow
Monday, December 20, 2010
Theme Decorating
I,m not really into theme decorating but sometimes a theme just presents itself to you and you run with it. This is what I was going to do in my family

bathroom this year. I saw this great idea(Thrifty
Decor Chick - it think) and decided to copy it. I got
couple of vintage ornaments from my stash and
some fake snow from the dollar store and plunked
them into an antique canning jar.
Cute ,but, then I
pulled out this little guy

And I thought - he looks a little lonely - hey I have an ornament somewhere with penguins on it and my girlfriend( thanks Kathy) gave me some penguin plates and voila - a  theme just happened!
 theme just happened!
 Merry Christmas All
Sunday, December 19, 2010
Christmas Mantle


Today I am posting pictures of my mantle all decorated for Christmas. This year (believe it or not) I went with a really simple version of the mantle I have had for the last few years. You see for years and years I didn't have a mantle and I REALLY wanted one. So when we bought the fireplace for this house ( yes it's electric) I really went nuts decorating it. I also always use gold and bronze ornaments with deep red pointsettias and accents of green and cream - told you I go all out. This year I wanted something different - I wanted it to match my kitchen - after all this is an open concept house and the kitchen and living room are one in the same anyway. I may even post pictures of my kitchen (if I get it cleaned up enough)
The Joy letters my daughter made last year from doller store frames and letters and scrapbooking paper. Total cost was under ten dollars. The two large glass clyindar vases were doller store finds and all the orniments were from my stash. The wreath sits on my front door during the spring and summer months and looks a little worse for wear. The garland is a plastic version of cedar garland given to my husband by a customer who happens to be a buyer for Christmas decorations for a large retailer - he buys way in advance so look for this stuff next year. Thats it. Pretty simple - too bad I couldn't have posted it sooner. I will try to get some pictures of my tree and other mantle later today and post those as well - buy for now
Wednesday, December 1, 2010

This fall I painted and redecorated my laundry room and main bathroom. This is a little side project I worked on as well. The shutters were scavenged from my office and have been kicking arround my garage for years. I cleaned them up and painted them with leftover paint from my other projects( more about that latter). I picked up these super cute little halloween plates from the Halmark store way last summer from the $2.00 table. The spider gives it an added halloween touch. Btw the key above came from goodwill -25 cents. Yea goodwill!
I can't wait to see what I can find for Christmas
Thursday, May 27, 2010

As a follow-up to the post of the other day, Five things to cook when it's too hot to cook, here is a dinner salad recipe from the dinner diva, Leanne Ely
Dinner Salad
Toss the following ingredients:
6 cups mixed salad greens (make sure some of it is spinach)
1 cup carrots, chopped
2 tablespoon red onion, chopped
1 Gala apple, cored, and cut into 1/4- inch cubes
2 tomatoes, diced
1 tablespoon almond slivers
1 roasted or grilled chicken breast, cut in strips
Dressing:
Mix together
1/2 tablespoon honey
1 tablespoon balsamic vinegar
1 squirt hot chili sauce (like Tabasco)
2 tablespoons extra virgin olive oil
Make as much of this dressing or as little as you want and store in the fridge to use anytime you need it.
WANT TO USE MY ARTICLE IN YOUR EZINE OR WEB SITE?
You can, as long as you include this complete blurb with it:
Copyright (C) 2010 www.savingdinner.com Leanne Ely, CNC All rights reserved.
Check out her web page the Dinner Diva for great meal plan ideas.
Continuing with the hot weather theme, today I was going to talk about Five Things to wear to work when it's hot.
Hopefully you have air conditioning at work, but even if you don't these ideal will help get you through the hottest days.
1. Sling back pumps. Regular pumps look too formal for the really hot days and sandals are too casual for work making the sling back pump(closed toe/ open back) the perfect choice. Alternatively, ballet flats also work fine depending on what else you are wearing. (as a side note- men should never, never show their toes at work - no exceptions).
2. Good under ware - clothing is lighter and flimsier in the summer - more likely to let a peek at your bra strap ect. Make sure this is the day you wear the good stuff. Also, if you have control top panties- today is the day to wear them as well, because you won't be wearing hose ect to keep everything in check.
3 Dresses - cool one piece dressing ideal for hot weather. Make sure sleeveless dresses have straps that are at least two fingers wide.
4.Capri's - Ok, by now you know I have some pretty conservative ideas about what correct work wear is - and now Capri's? really? Yes, Capri's can be wonderful and perfectly appropriate for work. Make sure the material is the same as a dress pant and the cut is not too tight. Remember the previous rules and pair them with sling back shoes rather than sandals and good under ware to eliminate vpl(visible pantie line). Add a light jacket and you have the perfect alternative to a suit for hot weather wear.
5 Last but not least(you should really wear it everyday anyway), please remember to wear sunscreen. Even if you spend most of your day under florescent lights, sunscreen will really help protect your skin.
So there you are, Five things to wear to work in the hot weather. Like always if you have any comments, feel free to send them to me.
Wednesday, May 26, 2010
Five Ways to Stay Cool Without Air Conditioning
Yesterday we talked about Five things to cook when it's too hot to cook. Since we are still experiencing a heat wave here in Ontairo, I thought I would come up with 5 ways to keep cool without air conditioning. Going without air is becomming more popular. Air conditioning is not only expensive to run, but it puts a tremendous strain on the electrical grid on hot days. Remember the blackout in Ontario and New York state of a few years ago.
1. Keep your drapes and windows closed on the hot side of the house. Don't let the sun beat in during the real hot weather. Use heavy drapes or blinds to keep the heat out. On windows that are shaded wear a cool breeze is comming in leave the windows open. Remember to open the windows for about an hour in the cool morning to cool the house down, but after that close the windows and drapes on the hot side. Even if you have central air this will be a big help in keeping the house cool
2. If you have a furnace you can set it to fan only. This will circulate the air from the cooler basement to the hotter rooms above.
3 Move to the basement. Many people have an extra bedroom downstairs. Why not use it during the hot weather. It will be like being on vacation.
4 Don't cook inside. Don't make anything that requires you to turn on the oven. Instead use the bbq, crock pot or rely on salads and foods that are served cold (see yesterdays post on cooking for hot weather) . If you must boil water for a pasta or tuna salad, try to do it early in the morning when it's cooler or better yet use the side burner on your bbq.
5. This is kind of a long term proposition, but often overlooked. If you own your home (or have an generous landlord), plant trees on the hot side of your house so that they will grow and shade your house. Ever notice that older houses with mature trees are always so much cooler without air. It's because of the shade effect from the mature trees. Plant the kind that the leaves fall off of in the winter so that the effect is reversed in the cooler months.
So there you are. Five ways to exisit without air conditioning. I'm sure there are many more. If you have any to share, please leave a comment. The hot weather has only just begun
1. Keep your drapes and windows closed on the hot side of the house. Don't let the sun beat in during the real hot weather. Use heavy drapes or blinds to keep the heat out. On windows that are shaded wear a cool breeze is comming in leave the windows open. Remember to open the windows for about an hour in the cool morning to cool the house down, but after that close the windows and drapes on the hot side. Even if you have central air this will be a big help in keeping the house cool
2. If you have a furnace you can set it to fan only. This will circulate the air from the cooler basement to the hotter rooms above.
3 Move to the basement. Many people have an extra bedroom downstairs. Why not use it during the hot weather. It will be like being on vacation.
4 Don't cook inside. Don't make anything that requires you to turn on the oven. Instead use the bbq, crock pot or rely on salads and foods that are served cold (see yesterdays post on cooking for hot weather) . If you must boil water for a pasta or tuna salad, try to do it early in the morning when it's cooler or better yet use the side burner on your bbq.
5. This is kind of a long term proposition, but often overlooked. If you own your home (or have an generous landlord), plant trees on the hot side of your house so that they will grow and shade your house. Ever notice that older houses with mature trees are always so much cooler without air. It's because of the shade effect from the mature trees. Plant the kind that the leaves fall off of in the winter so that the effect is reversed in the cooler months.
So there you are. Five ways to exisit without air conditioning. I'm sure there are many more. If you have any to share, please leave a comment. The hot weather has only just begun
Tuesday, May 25, 2010
Five Things to Cook When It's Too Hot to ook
I don't know wear you are, but we are experiencing a spring heat wave here in Ontario. I always try to plan my menus in advance but days like this throw all plans out the window and I'm scrambiling for a meal idea that won't heat up the kitchen and won't break the bank. This is what I came up with - hope it helps.
1. Toonie Tuesday - I only mention this because today is Tuesday and our local Kentucky Fried Chicken has a 2 piece dinner with fries for $2.00. Not my usual dinner but it will do in an emergency. Please, please add a salad for the nutritional value
2 Beef Dijon Salad - Slice deli roast beef and place on a bed of baby spinach or romaine lettice, add sliced mushrooms, orange segments, nuts - whatever suits your fancy and dirzzel with honey-dijon dressing.
3. Salad plate - If you can make a potato or macaroni salad early in the day and let it cool great, if not pick one up from the deli or grocery store. To this add some rolled up black forest ham slices, a few tomato slices, carrots, cucumber ect.
4. BBQ Fish - almost any fish fillet (basa, pollock, ect) place individual fillet in foil add a drizzel of olive oil, chopped tomatoes, chopped zuccini, chopped peppers and a bit of diced onion. Sprinkle with salt, pepper and Mrs Dash. Cook on BBQ for about 15 min on low - turing often . Serve with rice ( cook this on the side burner if you have one.)
5. Go All Out - Maple Glaze Salmon- I know this is fish again, but you wouldn't complain if I listed two chicken dishes. Mix maple syrup with soya sauce and baste the salmon - let it sit in this sauce for about 15- 20 min before grilling for about 10 min. or until the fish is flaky. In the mean time make a salad of baby spinach, mixed greens or even romaine. Top with rolled gold ( a mixture of dried cranberrys, seeds and nuts available in the bulk food section) and fresh sliced strawberries(optional). Drizzel with rasberry vinigrette salad dressing.
Hope these 5 dinner ideas help get you through this hot spell.
Thanks for reading this - my first ever post. I know it may not be too professional looking but it's a learning experience for me. Please leave a comment if you like.
1. Toonie Tuesday - I only mention this because today is Tuesday and our local Kentucky Fried Chicken has a 2 piece dinner with fries for $2.00. Not my usual dinner but it will do in an emergency. Please, please add a salad for the nutritional value
2 Beef Dijon Salad - Slice deli roast beef and place on a bed of baby spinach or romaine lettice, add sliced mushrooms, orange segments, nuts - whatever suits your fancy and dirzzel with honey-dijon dressing.
3. Salad plate - If you can make a potato or macaroni salad early in the day and let it cool great, if not pick one up from the deli or grocery store. To this add some rolled up black forest ham slices, a few tomato slices, carrots, cucumber ect.
4. BBQ Fish - almost any fish fillet (basa, pollock, ect) place individual fillet in foil add a drizzel of olive oil, chopped tomatoes, chopped zuccini, chopped peppers and a bit of diced onion. Sprinkle with salt, pepper and Mrs Dash. Cook on BBQ for about 15 min on low - turing often . Serve with rice ( cook this on the side burner if you have one.)
5. Go All Out - Maple Glaze Salmon- I know this is fish again, but you wouldn't complain if I listed two chicken dishes. Mix maple syrup with soya sauce and baste the salmon - let it sit in this sauce for about 15- 20 min before grilling for about 10 min. or until the fish is flaky. In the mean time make a salad of baby spinach, mixed greens or even romaine. Top with rolled gold ( a mixture of dried cranberrys, seeds and nuts available in the bulk food section) and fresh sliced strawberries(optional). Drizzel with rasberry vinigrette salad dressing.
Hope these 5 dinner ideas help get you through this hot spell.
Thanks for reading this - my first ever post. I know it may not be too professional looking but it's a learning experience for me. Please leave a comment if you like.
Subscribe to:
Posts (Atom)